Author Archives: Nate

The Racist, Sexist, Misogynistic, Islamophobic America

For all the liberal talk of Trump winning because America is a bunch of racist, sexist, misogynistic people, I don’t think that’s why he won. He won because people are tired of the corrupt, spineless government we have on both sides and they didn’t want another corrupt, self-serving “leader”.

Hillary and her family and platform have proven time and again they cannot be trusted and have little to no regard for law. From her attempts at covering up her husbands scandals, to the lack of regard for American lives in Benghazi, to her lack of regard for the law in what many would see as an obviously massive security issue in running her own private server while handling top secret governmental information. And let’s not forget the fact that Hillary was basically handed the nomination by the DNC, who had decided prior to the primary they were going to push for her, instead of Bernie.

As for the Republican party, they also have proven time and again that just because someone claims they’re “conservative” doesn’t mean they are going to actually step up and act in accordance with the beliefs of the people who elected them, even when it’s hard. Many of the career Republican career politicians are no better than democrats when it comes to taking a stand on issues like Obamacare, the 2nd amendment, and other major discussion points of late.

This election had a very high voter turnout, and a large chunk of that was the rural population, the working class that the liberals claim they are for. Hillary overlooked them, as usual. Recently, these people felt on the outside of politics and haven’t really liked any of the candidates, career politicians and the like, so they didn’t vote. Trump took on the establishment of two parties and won, while maintaining his position of not taking anything from anyone, someone who the people believe can be the catalyst to make real change happen.

Take West Virginia for example. Almost their entire economy is based around coal, something that the democrats have been pushing to elminate far to fast. I’m not against green energy and climate change, as a Christian I’m called to take care of the earth. However, I don’t think it should come at the expense of jobs and livelihoods. With four more years of liberal leadership, I think those people would have lost their jobs and more very quickly.

Michigan. Where I’m from. We haven’t gone red for a VERY long time. I think the change happened because the auto workers left. Michigan used to be the auto capital of the world, and now Detroit, Ann Arbor, Flint – all these places are falling into disrepair because the jobs left. Higher taxes and environmental requirements (both of which are key points that liberals push for) killed many of those jobs, by the very people who were supposed to be helping. Of course there were other factors at play, but it remains the fact that the democrat-led bailouts did not accomplish all they were supposed to.

All in all, I don’t like where this nation is at. We’ve become heavily split over party lines on everything from whether or not coal should be allowed to whether a guy has the right to use a girl’s locker room. Throw in race issues, the massive looming debt we’ve acquired, and the many enemies we face abroad and at home and you’ve got a royal tempest of grandiose proportions. I’m not going to get into these issues, but it remains the fact that we’re a heavily divided nation that needs a lot of work from both sides to solve our problems. And big government, taxing the rich, and climate change won’t fix that.

To all of the homosexuals, women, and minorities out there – I’d like to apologize for what has been said. Much of it was not good and not right. I’m not condoning what he has said, and I sincerely pray he will not act out against you in the ways he has spoken. God loves you, and although I may not always agree with everything you stand for, I still believe your lives have worth, no matter what some big heads have said.

That said, I don’t think that America is the racist, sexist, islamophobic country that the liberals have painted conservatives as, and I think we have escaped a far worse fate in electing Hillary. We are still one of the best nations in the world when it comes to freedom and equality, and I hope we can come together to heal the many problems we face in unison.


This blog isn’t turning into a political source, this is just me getting my thoughts off my chest in the aftermath of this crazy election cycle and after reading the many posts and tweets and retweets and statuses of people both for and against Trump.

So, two weeks ago, I posted My Weekly Goals where I posted four different things I was going to try to do over the coming week. Obviously, that morphed into two weeks, but whatever.

Here’s my report card from weeks 1 and 2. Spoiler alert, it’s not good.

  •  Minimize wasted time on internet (Youtube, social media checking prior to school being done, etc.)
    • B
    • I would give myself a solid B on this. I had a few days where I slipped up and watched a bunch of rando Youtube videos and got little done with my screen time. But, for the most part, I didn’t spend tons of time reloading Facebook, Instagram, etc.
  • Exercise each day (Body-weight/Darebee, Ultimate practice)
    • D
    • This … didn’t happen. I exercised Tuesday of two weeks ago, and I think maybe Wednesday or Friday too (had practice on Thursday). And this past week I didn’t, other than Thursday. So, giving myself a D on that one for not a total failure … but mostly.
  • Practice juggling and/or guitar every day
    • F
    • Again, this didn’t happen. I practiced juggling 2-3 times two weeks ago, and maybe once this last week.
  • Get off the computer by 9PM and get to sleep by 10 without using a screen
    • F
    • Out of the fourteen days between this post and last I had maybe 5-6 where I was solidly off of screens by 9PM.

After putting those grades through a calculator, looks like I’m stuck with a D overall. Hopefully I do better this week.


This Week’s Goals:

  • Practice Guitar or Juggling each day – again
  • Exercise each day (the Ultimate season is over, sadpanda, so I need this even more)
  • Don’t spend more than 3 hours on the computer outside of school when family is around
  • Don’t spend more than 30 minutes at a time on the computer without stepping away, stretching, etc.

Let’s do this!

Weekly Goals – Someone is Flunking

My Weekly Goals

Hey, it’s me again. Yup, that guy who wrote some stuff. No big deal.

This is something that a blogger that I like, currentlykelli, does and I figured it might not hurt to give it a go.

Basically, you set 3-5 goals per week each Sunday/Monday to focus on, then you grade yourself as honestly as possible on how you think you did with the previous week’s goals. Obviously, this is my first week trying this, so I can’t grade myself on last week, but here are my goals for this week!

  • Minimize wasted time on internet (Youtube, social media checking prior to school being done, etc.)
  • Exercise each day (Body-weight/Darebee, Ultimate practice)
  • Practice juggling and/or guitar every day
  • Get off the computer by 9PM and get to sleep by 10 without using a screen
Tagged ,

Let’s make an Amazon Alexa device!

Wow, it’s been a while since I posted on here. I’ve been really busy working on programming projects with some of my friends and just haven’t had anything super interesting to blog about.

Enough with that though, let’s get on to what this is actually about! I recently saw a video done by the Youtuber Novaspirit Tech where he takes a Raspberry Pi 2 and implements the Amazon Alexa system!

I’ve had a Pi Model B since a few months after they initially launched and more recently received a Pi 2 from Element14 (you can watch my video reviews of them over on my, admittedly also recently neglected, Youtube channel AEVES Tech) and have been looking for interesting projects to do with them.

This hit the spot perfectly, and so I started out setting up my Pi Model B! Now, most of the tutorials use the Pi 2 as the base device, but my Pi 2 is currently serving as a code server for me, and I didn’t really want to go through the trouble of transferring everything over. Plus, I figured it might make the process a bit more interesting, in case I had to tweak some values.


Setting up the Pi

Obviously, the first thing needed here is to get the Raspberry Pi up and running.

The process of installing Raspbian differs a bit between whatever OS you’re using (Linux, Mac OS X, Windows) so I’m just going to give you a link to the official Raspberry Pi foundation’s page on how to do it.

Once you’ve got the SD card flashed, go ahead and stick it in the Pi. The next part depends on whether or not you want to have the Pi connected over WiFi or not. If you’re planning to just connect over Ethernet then you can skip over this section and move on.

I’ve always used the Edimax EW-7811UN and never had any problems with it on Raspbian, so if you need to buy an WiFi dongle I can definitely recommend this one.

I set up WiFi via the Terminal over SSH, which can be a little bit complicated, so I’m going to go over that here. If you’ve got your Pi connected up to screen and are using the GUI it’s easier.

Once you have terminal access (via SSH over Ethernet or via a Serial to USB cable) you’re going to need to find the SSID for your network. To do this, go ahead and run sudo iwlist wlan0 scan.

This is going to spit out a whole bunch of information, most of which we’re not going to need. Look out for these two lines:

  • ESSID:"networkNameHere"

    This is the network name that you want to connect to. Make sure it’s your network, we’re going to use this value later on.

  • IE: IEEE 802.11i/WPA2 Version 1

    This is the security type. Most modern routers are set up to use WPA2 Personal, and this tutorial will work with both that and WPA, but it may have issues with WPA2 Enterprise or WEP. If your network is set up with WEP, then you’ll have to adjust the setup a bit later on, and you really should think about changing to WPA2.

Now that we have that information, go ahead and run sudo nano /etc/wpa_supplicant/wpa_supplicant.conf and enter the following text:

network={
    ssid="networkNameFromEarlier"
    psk="yourWiFiNetworkPassword"
}

If you’ve got a WEP network, then you’ll need to change out the psk line for wepkey0=your104BitWEPkey. Make sure you don’t put quotes around that key.

To save the file, press Ctrl-X then Y and then Enter. This will save the file. Go ahead and reboot the Pi via sudo reboot.

Once you’ve rebooted, you can check if you’re connected or not via running ifconfig wlan0 and seeing if there is an IP address next to the inet addr field:

$ ifconfig wlan0
    wlan0 Link encap:Ethernet HWaddr 80:1f:02:bf:04:ec 
     inet addr:192.168.0.12 <-- there is a number here Bcast:192.168.0.255 Mask:255.255.255.0
     inet6 addr: fe80::8ec:9767:b412:4a91/64 Scope:Link
     UP BROADCAST RUNNING MULTICAST MTU:1500 Metric:1
     RX packets:20891 errors:0 dropped:209 overruns:0 frame:0
     TX packets:7167 errors:0 dropped:4 overruns:0 carrier:0
     collisions:0 txqueuelen:1000 
     RX bytes:22347220 (21.3 MiB) TX bytes:996632 (973.2 KiB)

If you have an IP address, then we can move on. Otherwise, make sure you typed the network password correctly in that file and try again.


Setting up Alexa

Hooray! You got the Pi set up, now we get to get started on the fun part, setting up Alexa!

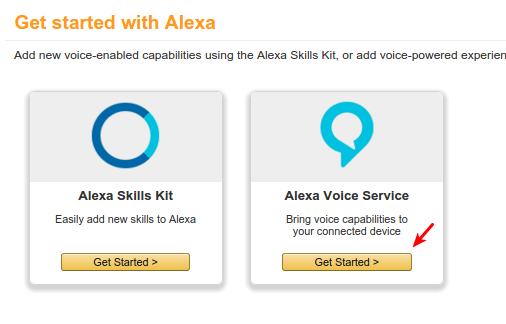
You’re going to need to sign up for an Amazon Developer account, which you can do here. You’ll need to sign in to your Amazon account, and then go to this address: developer.amazon.com/edw/home.html. Once you’re there, click on the Get Started> button for Alexa Voice Service:

Selection_019

From there, you’re going to click on Register a Product and in the drop-down, select Device:

Selection_020

Now, you’re going to proceed through the four parts of the setup process. They’re personal choice for the most part, and the site does a good job of guiding you through, so there’s nothing I really need to explain other than the Web settings part.

This is important because of how you get permission to use Alexa (via OAuth), you have to set up origins and return URLs, otherwise you won’t be allowed to connect to the Alexa voice service. So, you’re going to need your local IP address for the Pi. This is pretty simple to get, just run ifconfig wlan0 | grep "inet addr" (swap wlan0 for eth0 if you’re connecting over Ethernet.). You’re going to want to take the value right after the red text:

Selection_021

In my case, it’s 192.168.0.106.

Take that value and under the Web Settings tab on the Security Profile page:

Selection_024

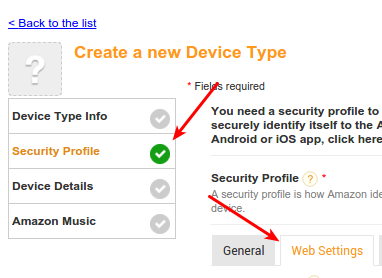
put that value in like this:

Selection_023

swapping out 192.168.0.106 for whatever IP address you got. Finish up the rest of the setup, and you’re ready to get on to the rest of the setup. Make sure to write down the Device Type ID, Security Profile Description, Security Profile ID, Client ID, and Client Secret – you’ll need them for the setup script later.

I’m using the code from sammachin’s AlexaPi repository, but it’s going to require a few tweaks to actually work. For now, just run git clone https://github.com/sammachin/AlexaPi and it should get the code right off Github!

If you get an error about git not being installed, just run

sudo apt-get update && sudo apt-get install git

and then try again.

Once you get the code, go ahead and type cd AlexaPi and then sudo ./setup.sh. This is going to install a few different required libraries and set up the Python code. You’re going to need the credentials you got from Amazon earlier, so put those in as requested.

Now, the setup script doesn’t work correctly, it doesn’t actually create the required creds.py file, so we’re going to have to manually do that ourselves.

Run mv example_creds.py creds.py and then nano creds.py. You’ll get a file that looks something like this:

# RENAME THIS FILE TO creds.py before use!
import os

#Alexa Settings
ProductID = ""
Security_Profile_Description =""
Security_Profile_ID  = ""
Client_ID = ""
Client_Secret = ""

# Alexa Refresh Token
refresh_token = ''

and put in the information from Amazon where it belongs in the file. Don’t worry about refresh_token still being blank, that gets taken care of in a bit.

If you are logged into your Pi as root, then you’re ready to go, go ahead and skip down to the hardware setup section. If not, read on.

The original code was written to be run as root, but this isn’t exactly good practice, so we’re going to have make a few changes to make it run correctly.

First you’re going to need to edit the startup script in /etc/init.d/alexa, run sudo nano /etc/init.d/alexa and look for the line

python /root/AlexaPi/main.py &

and change out /root for /home/pi. Once you do that, save and exit via Ctrl-X, Y, Enter.


Setting up the hardware

Since the Pi doesn’t have a built-in Microphone port, you’re going to have to use a USB device. It can be a USB microphone or a USB soundcard that has a microphone port. Plug that in, as well as connecting a speaker, either via the Pi’s 3.5mm jack, or via USB.

I’m using my CAD U1 USB microphone, and connecting a speaker up via the 3.5mm jack and it works just fine.

You’re also going to need to hook up a push-button connected to GPIO pin 18 and GND. Part of the terms & conditions of using the Alexa voice service is you can’t have it be voice activated, so we have to manually activate the listening via pressing a button.

Here’s a diagram to show you how to connect it up, if you don’t already know:

pi_alexa


Final Setup

Now that we have the microphone, speaker, and button connected, we can go ahead and finish everything up!

You’re going to need to run sudo python auth_web.py and then go in a webbrowser to yourPisLocalIPAddress:5000. This will redirect you to an Amazon page asking you to log in and then confirm that you want this device to have access to parts of your account. Go ahead and continue through the login process.

After you log in, it should show a page letting you know that it succeeded and you can now reboot your Pi. Go ahead and do that via sudo reboot and wait for it to reboot.

You should now be able to boot your Pi and hear a female voice say “Hello”. Once you hear this, you can press and hold the button and ask Alexa a question!

If you don’t hear this after a while, you may have to SSH in and manually run the script. Just ssh in to the Pi and run

cd AlexaPi && sudo python main.py &

You should hear the “Hello” voice in a bit, and you can go ahead and ask away.

Congratulations, you’ve just created your own Raspberry Pi-based Alexa device!


Conclusion

Is this really useful? I suppose it depends on how you define that.

It’s a bit cheaper to build this than buy the $129 Amazon Tap, especially if you already have all the parts on hand. However, it looks far less pretty and isn’t officially supported by Amazon, so they could decide to end the AVS (Alexa Voice Service) at any time, leaving you with a Raspberry Pi connected to a speaker and microphone.

For the time being, it’s a fun little way to put your Raspberry Pi to use, and, if you really wanted an Amazon Echo and don’t mind a little bit of open circuitry, it’s saves you a little bit of money.


Tagged , , , , , ,

Ubuntu Tech Snippet #13 – Get your public IP in terminal

Sometimes when you’re working on a project or are SSHed into a remote server, you need to find out the public IP of the device, without using a GUI web-browser.

I had to do this while working on setting up a script on my server, and came across this neat little command that will grab your public IP and print it nicely out for you to use!

All you have to do is run echo $(curl -s https://api.ipify.org) and you’re good to go!

Output from echo $(curl -c https://api.ipify.org)

Output from echo $(curl -c https://api.ipify.org)

You can also do this programatically. In python you can run this code to get the result as a JSON object:

import requests
session = requests.Session()
ret = session.get('https://api.ipify.org',
                   params={"format":"json"})
print ("Public IP Address:",ret.json()['ip'])

You’ll need to install the Python Requests module. This can be done either via pip. Just run sudo pip install requests. You can technically install it using easy_install, but please, please don’t. Just use pip.

And that’s it!

Thanks for reading! If you have any tips of your own, leave them as a comment down below and I’ll be sure to take a look at them!

Tagged , , , ,

Google and Youtube April Fools Day 2015 Roundup

So, it has struck again. The first of April is upon us yet again and Google, as usual, has a few tricks up their sleeve.

But first, where on earth have I been? Well, yeah. I’ve been really busy with life (school is horrible for having time to write) and I just didn’t have anything terribly interesting to write about.

But, I’m back. Not sure how often I’ll be posting here, but hopefully it will be more often than once every 3 months or whatever it has been. I apologize to anyone who actually reads and enjoys my blog.

Anyways, on to Google April Fools day jokes.


Google April Fools Day Jokes 2015

I’m gonna do this via categories, sorta…

The Nostalgic Award goes to … Google Dial-Up mode!

With Google rolling out Uber-fast internet access to several cities around the country, they figured people would want to be able to slow down for a bit. And, as they say, give more hugs. And, 56k modem sounds man! Right there in your browser! It’s incredible!

It’s also a great way to get your kids off the internet. If they spend all day watching Youtube videos or chatting with friends, just turn on dial-up mode and make them feel the pain you did back in the day. (Granted, back in that day, 56k modems were all the rage. Buuuut….we’ll ignore that point.)

Next up, we’ve got the Party Award goes to … The Keyless Keyboard!

Basically put, it’s a fancy-ified party noise-maker. What makes it fancy you ask? Well, watch the video!

The Cute (or, should I say, Kawaii – かわいい ) Award goes to … Google Panda!

This cute little Asian stuffed animal is all you’ll ever need again. Need to know what it’s going to be like outside today? Just ask Google Panda!

Want a companion who can answer questions when you’re out running? Google Panda is there to help again!

Oh yeah. And it comes in two sizes. The Google Panda 5 and Google Panda 6.

The Gamer Award goes to … Google Maps – Pacman Edition!

Selection_070


If you want to give this one a go (and I’ll warn you, it ain’t easy), then read this post on Bustle on how to get started wasting your day eating dots and avoiding ghosts around your house and workplace. Who knows, maybe one of those ghosts is that boss you really hate!

Now, this one could really give the Dial-Up mode a run for its money in the Nostalgic Award runnings. I really had a hard time deciding. I know! You guys tell me down in the comments what you think. Should this one (Google Maps – Pacman Edition) or Dial-Up mode receive the Nostalgic Award?

General Absurdity Award goes to: Google! Or rather, elgooG!


elgooG - Mozilla Firefox_071

If you go to com.google (yes, that’s right. Just type in com.google in the address bar – it’ll work) this’ll come up. Interesting fact, this is the first that Google has used their top level domain name .google.

It’s a fully-functional version of Google, with everything reversed.

The Social Media Award goes to … Chrome Selfie!

chrome selfie

(Image from Bustle – click the image to read their post)

Now, I don’t actually have a mobile device, nor do I use Chrome, so this one … really doesn’t affect me. But hey, I’m posting about all of elgooG’s exploits today, no discrimination here!

The Futuristic Award goes to … Smartbox by Inbox by Google:

Tired of getting junk mail in real life? Tired of being bombarded by annoying catalogs of junk? Well, no more. With Smartbox by Inbox by Google, you’ll be good to go. It has a motion sensor, so you’ll never have to actually touch your Smartbox by Inbox by Google to get your physical mail, and it’ll even sort it into Smart Folders for you!

Don’t want certain mail? Well, Smartbox by Inbox by Google has you covered. It’ll electrically zap any annoying spammers!

And, apparently, you can have Google Hangouts chats on it too and it runs full Android. So you’re basically getting the world’s bulkiest tablet that also sorts your mail for you.

The Youtube Meme Award goes to … dudududu The Darude Sandstorm button!

Prepare yourselves ladies and gents. For you are about to be …. DARUDELY RICK-ROLLED!

Selection_072Just kidding, I wouldn’t Rick-Roll you. However, this is part of Youtube’s April Fools joke.

If you’ve been on Youtube and read basically any comments within, oh, the last 6 months plus, you’d know what Darude Sandstorm is. If not, you have narrowly escaped with your sanity.

Basically, if you search certain videos (Rick Roll being one of them, Rebecca Black Friday another, I’m sure there’s more) you’ll get that little Did you mean: Darude - Sandstorm by Darude popup-thing.

Youtube wants to make sure you’re nice and sandy.

In stupid infomercial voice But wait! There’s more! If you watch a video, you can play Darude Sandstorm over top of it! That way, you can listen to Darude Sandstorm while listening to Darude Sandstorm!

Just click the little Music note in the bottom-right-hand-corner of any Youtube video, and it will play snippets of Darude Sandstorm for you! You’re welcome.


Selection_073

If I find out about any more April Fools day jokes, I’ll update this post. But that’s all for this post. Thanks for reading guys!

Tagged , , , , ,

Ubuntu Tech Snippet #12 – Fix the NVIDIA screen flicker bug in Ubuntu

NVIDIA. Oh how we love to hate thee.

NVIDIA and its proprietary graphics drivers have long been a bane of users on Ubuntu. If you needed performance, then you had to use the proprietary drivers, as Nouveau just couldn’t keep up. However, the NVIDIA drivers can be fickle to install and keep up to date, and often cause graphical issues like black screens or, as this post talks about, screen flickering.

This bug has been around since Ubuntu 8.04 Hardy Heron, and is still present in Ubuntu 14.04.1 – this bug refuses to die. This issue cropped up for me and some other users after a recent kernel upgrade.

There have been numerous attempts to fix it, including going so far as to patch Compiz to attempt to fix this. However, I’m going to be showing you a far simpler method.


Solution:

I originally found this solution over on the Ubuntu forums, you can read that post here and the bug (started way back in September of 2008) on Launchpad.

To fix this you’re going to need the CompizConfig Settings Manager software. If you don’t already have it installed, press Ctrl+Alt+T to open a Terminal:

Screenshot from 2015-01-31 10:34:36

Once that terminal is open, enter sudo apt-get install compizconfig-settings-manager and hit enter. You’ll probably need to enter your password, but once you do it will install. Don’t close the terminal.

Once installed, go ahead and enter sudo ccsm. This will launch CompizConfig Settings Manager. It will show you a warning about the program being very powerful, probably say something along the lines of “With Great Power comes Great Responsibility”. Just click okay:

Screenshot from 2015-01-31 10:35:40

Once it comes up, search for workarounds and select the only option that comes up:

CompizConfig Settings Manager_001

Then, scroll down and select the Force full screen redraws (buffer swap) on repaint option:

CompizConfig Settings Manager_002

Once you’ve done that, you can close Settings Manager, and you’re done! This should have helped if not resolved the screen flicker issue for you!

Obviously, this isn’t an actual solution or bug fix, but it’s a workaround that does its job – stops the dreadful NVIDIA redraw bug from doing it’s horrible deed.


Tagged , , , , , ,

How to install Ubuntu MATE Remix on a PowerPC Computer

PowerPC (actually an acronym for Performance Optimization With Enhanced RISC – Performance Computing) is an old CPU architecture that isn’t really used much any more.

Originally created in 1991 by Apple, IBM, and Motorola, the PowerPC architecture was originally created for personal computers and was/is best known for powering Apple computers from 1994 to 2006, before Apple transitioned entirely to using Intel processors.

I could go into more detail about the whole history of PowerPC CPUs and their uses, but that’s not what this post is about.


Mac OS? Nah, let’s go full-Linux

I originally recieved the mid-2005 iBook G4 from a relative as a Christmas present, Christmas 2013. The person who sent it actually hadn’t used it in a long time and had forgotten their password – so I was left with a bootable – but unusable iBook. Oh noes!

Luckily, I had read a post by Lifehacker from their “Evil Week” regarding breaking into Macs. Please note, this is not something I condone, unless you are breaking into your own Mac. Please hack responsibly.

So, I was able to get in, add a new user (my own) and continue using the iBook. Now, as you can probably tell from many of the posts on here, I’m a huge Linux/Ubuntu fan. As such, I wanted to install Lubuntu on the iBook – both because I prefer Linux, and because I wanted better performance. So I tried to dual-boot Lubuntu and OS X Tiger (what was on it when I got it.)

That didn’t go well.

I managed to accidentally erase the OS X partition, and then without realizing I had done so, completely overwrote it with Lubuntu. Hooray me.It really wasn’t that big of a deal, because I, like I said, prefer Linux/Ubuntu over any other OS out there.

So, to cut a long story short, I used Lubuntu 12.04 LTS for a long time, then tried upgrading to Lubuntu 14.04 LTS – and managed to break the system. It still booted and everything, and I could log in and use it, but the GUI, icons, and background were all messed up.

I then built my desktop, and had no need for the iBook any more – so away into storage it went. That is, until I read this post on OMG! Ubuntu! about someone porting the Ubuntu 14.04 MATE Remix to PowerPC. I knew that I had to try this out.


Initial Research

To start this whole project off I, obviously, read that post on OMG! Ubuntu! that I linked to above. I then downloaded the ISO from the G+ post linked on the OMG! Ubuntu! post.

Now, this is where the fun stuff starts happening. I knew that the iBook G4 that I had didn’t support USB booting by default – but I had read a while back that you could work your way through OpenFirmware and “hack” a USB boot.

So, I went a-searching on the internets, and came across this post from 2010 on Ben Collins’ blog describing exactly what I wanted to accomplish – booting an iBook G4 from USB.

In order to gain access to Open Firmware (which is what I would have to do to boot from USB) I had to press Command+Option+O+F and hold that while the iBook booted – until the Open Firmware screen came up.

Now, I originally ran into some trouble with the USB stick/LiveUSB-creator-software I was using in that it wasn’t actually installing the bootloader (a known bug in Startup Disk Creator.)

Screenshot from 2015-01-17 21:11:57

I ran the boot ud:,\\:tbxi command in Open Firmware, and was spat back

can't OPEN: ud:,\\:tbxi
Can't open device or file
  ok

Uh oh. Something’s not right here  – it should have booted.

The blog post by Ben Collins listed another method, so I tried that. Same thing – no USB boot and an error message. Strange stuff.

Anyways, I figured that it had to do with the bootloader error I was getting from Startup Disk Creator, and decided to try putting the ISO onto the USB stick via unetbootin. Flashed the ISO to the USB stick, booted the iBook into Open Firmware, and got the same error:

can't OPEN: ud:,\\:tbxi
Can't open device or file
  ok

Now, I’m not sure if this is a bug in both the Startup Disk Creator and Unetbootin software on Ubuntu 14.04 – but I do certainly find it strange that they both failed.

So, I turned to the ever-potent, ever-renowned, Disk Destroyer. That’s right – I used dd. (Crosses self and mouths 20 Hail Linus’).

It really wasn’t that bad, I was just extremely careful about what I was reading/writing to/from. I ran a simple sudo dd if=./ISO-FILE.ISO of=/dev/sdg command (dd is a very powerful tool – be extremely careful when using it. Double, triple, even quadruple check what you’re reading/writing to/from.) Your USB device will probably be different from mine (mine being /dev/sdg) – make dang sure you know what device you’re writing to.

This flashed the ISO to the USB stick, and I pulled up Open Firmware again. Again, same error.

However, since this was the last idea I had to get this working, I was determined to get it working. I read through all the comments on the Ben Collins blog post, trying all the solutions – nothing worked.

I was giving it one last go and decided to switch USB ports on the iBook. Up until now, I had been plugging the USB stick into the port closest to me – so I switched it to the other USB port, closest to the screen – and it booted! I got a yaboot prompt and was able to boot the iBook – albeit with a lot of graphical issues.


The Installation

There’s a common issue with running Ubuntu (and it’s offspring) on many old PPC Apple laptops – the ATI Rage 128 Graphics.

This chip causes many issues, from graphical corruption, to general slowness, to entire failure to show anything at all on the screen! Fortunately, the fix is relatively simple from yaboot (Yaboot being the Linux bootloader on PowerPC systems.)

Normally, when you get to the Yaboot prompt you would just hit enter and it would, by default, boot the LiveUSB. However, to fix the graphics issue enter live video=offb:off video=radeonfb:off video=1024x768-32 radeon.agpmode=-1 and press Enter. This disables the radeonfb framebuffer, sets the video parameter 1024x768-32 (resolution?), and finally forces PCI mode (a work-around necessary for 3D acceleration.)

If this doesn’t resolve the graphics issue try reading the page on the wiki – PowerPCKnownIssues. Even if this solution works for you, I suggest you at least skim that page – it will help you with a plethora of issues.

While you’re booting, you may notice an error message regarding Firmware file"b43/ucode5.fw" not found:

Sorry about the potato quality - This was taken after dark and the light wasn't the best

Sorry about the potato quality – This was taken after dark and the light wasn’t the best

This is simply the airport card complaining about not having the firmware – not something that is going to cause any problems with the installation.

Go ahead and continue on with the installation, the system should continue booting just fine.

Note! When booting other versions of Ubuntu (vanilla, Lubuntu, etc.) you may run into this error and have it actually halt the boot. If this happens, change the yaboot parameters to include b43.blacklist=yes as part of the yaboot command. The full solution to this issue is beyond the scope of this post, but feel free to comment and I’ll try to help!

When presented with the Preparing to install Ubuntu screen, you’ll notice that the Download updates while installing option is greyed out. That’s fine, it’s something you can really only fix after you install.

mate-installer2

Once you’ve got the system booted from USB & running without crazy graphic weirdness there is pretty much nothing left. Once I had booted from the USB stick & set the yaboot flags I was able to install just fine – no more hackery required.

Just set up your system the way you want it as prompted, and let the installer run! Once installed, reboot. I was able to just reboot, and it pulled right up.


Fixing the WiFi

When you reboot you should see the yaboot prompt and then be able to boot. Just let the system boot, you shouldn’t have to interact with the system until you get to the login screen.

Log in, and when possible, pull up a terminal (Ctrl+Alt+T).

Now, you’re going to need an Ethernet connection for this next step. You can technically download everything you’d need on another Ubuntu/Debian machine – but it would be more pain than it’s worth.

Just connect the iBook to your router/network hub for a quick sudo apt-get update and then sudo apt-get install b43-firmware-installer.

This will download and install all of the necessary drivers for the Airport Extreme WiFi card in the iBook G4. Once the drivers are downloaded & installed, you can reboot again, and you should be able to use your WiFi!


Conclusion

Once you finish installing the drivers you can continue on setting up your system as you wish.

The instructions I wrote here are my personal experiences with the iBook G4. The issues and solutions may vary between devices.

Now, keep in mind that although Ubuntu MATE is not a Beta piece of software, PowerPC support still is. There is an Ubuntu Forums thread regarding installing Ubuntu MATE Remix on PowerPC which is pretty active and should help you with any issues that may arise.

I have noticed a few bugs – the most major being that when I suspend the laptop by closing the lid and resume – I’ve lost WiFi capabilities and the ability to run sudo! This, and the Mesa issuing false colors in games cropped up in Pinta (as noted here) bug are ones that I’m working on figuring out a solution/work-around to. If I do find (a) solution(s), I’ll post about it here.

Hope you found this post useful! Please feel free to leave a comment down below with your experience & any questions/solutions you may have!

Tagged , , , , , , , ,

Fixing the infamous wallpaper and mouse Ubuntu 14.04 bug

I recently blogged about the trial and tribulations of installing the NVIDIA graphics drivers on my Ubuntu 14.04 system. And, although I had much better performance, my ventures into the underground world of drivers and bugs was far from over.

I had been happily using my deskop with my newly installed NVIDIA drivers – no problems whatsoever. I shut down after a while because I was done with what I was doing and left my PC.

I came back a while later, started up the system, logged in, and it just sat there. I waited about 5 minutes and was becoming really worried, because this computer definitely should not take more the 20 seconds tops to log in. All that was showing up was the wallpaper and the mouse – no Unity menus or anything. I rebooted several times, same thing – wallpaper and mouse, but no GUI.

By this time I was freaking out. The last I thing I wanted to deal with was having to reinstall and lose all the time and effort I had spent getting this system where I wanted it. I booted up the LiveUSB stick I always have with me and started looking at solutions online – all of which required terminal access – something I didn’t have.

I tried everything from installing GRUB Repair to the LiveUSB and using that to add the nomodeset flag to GRUB, to using chroot to attempt to run commands off the LiveUSB to affect my system – neither of which worked.

By that point I actually had to go somewhere, so I had to shutdown the computer and leave it be for ~30 minutes. After I came back I started up the computer and, for whatever strange reason, now had access to the TTYs. I had no clue why waiting half an hour changed something – but it did.

This was quite calming because I knew that once I had access to a TTY I could fix basically anything. I started trying out solutions again. I looked at tons of different posts on various sites, namely Ask Ubuntu, but also the Ubuntu Forums and Launchpad.

I ended up coming across this question, here, and worked my way through those solutions.

I tried resetting the desktop as per the first, second, and sixth fixes listed – none of those work.

I then the third solution, purging and reinstalling ubuntu-desktop, compizconfig-settings-manager, upstart, and unity. I did this via sudo apt-get install --reinstall ubuntu-desktop unity compizconfig-settings-manager upstart – but nothing happened.

I then tried the fifth fix, clearing Unity, and that brought some improvement. I rebooted after running those commands and I had desktop icons back! Yay!

However, it still wasn’t totally fixed, and the only solution left was the fourth one.

I had held off on the fourth fix, because the Xorg-edgers PPA is a bleeding edge repository and so it can be dangerous to system stability. I was trying to fix a problem, not make it worse. However, after working through all of the other solutions, and having no results, I was left with the only choice of adding the repository.

So, I added the repository, ran sudo apt-get update and then ran sudo apt-get install nvidia-340. I rebooted, and had a working system. Because of the fact that I had removed all the configuration files previously, I had lost my background and icons that I had pinned to the dash, but that wasn’t an issue.

I removed the Xorg-Edgers PPA via sudo add-apt-repository --remove ppa:xorg-edgers/ppa -y, just to make sure that I didn’t have any updates in the future to break my PC. Hopefully, this is the last of driver derping I’ll have to do for a while.

Make sure to leave a comment saying what you thought of this post, and tell any experiences you’ve had with drivers and NVIDIA with Ubuntu!

Tagged , , , , , ,

Installation of proprietary NVIDIA drivers on Ubuntu 14.04.1

I recently built a brand new PC – which was awesome – with an i5-4690k, 8GB RAM, and a EVGA GeForce GTX 750 Ti GPU.

Now, for basic work, the open source Nouveau drivers work just fine. However, this system was made to be a high performance video editing & graphics rig – so I wanted to have the best performance possible; and NVIDIA’s proprietary drivers provide the best performance.


Normally, one could simply open up the Additional Drivers tab in Software & Updates, but my system, strangely, said there were no drivers available:

Screenshot from 2014-12-16 17:50:06

This was very strange, as I knew that there should be something listed there.

So, I took to Stack Exchange. The Stack Exchange network, in this case specifically Ask Ubuntu, is an amazing tool and has helped me countless times. I was talking with a couple of more advanced Ubuntu users (if you’re on Ask Ubuntu – Seth & Mateo) and we managed to find a solution – though it was rather hacky to say the least.


Tricks, Traps, and Hackery

When I say the solution was hacky, it’s not hacky in the form that I was piecing together drivers and compiling my own kernel – it’s that it was hacky because of the amount of steps it took to complete what should have been relatively simple.

First off, I tried running updates. That should be the first thing you do when debugging an issue, unless of course there is a known issue with an update that’s even worse. Then you might want to skip the update. That didn’t help any, still nothing was shown.

Next up, I looked around at other solutions to the same problem. As I soon found out, this is actually a fairly common bug in 14.04, with the NVIDIA drivers not showing up. Most of the solutions involved enabling the Xorg-Edgers PPA – something I wasn’t totally comfortable with, since the Xorg-Edgers PPA is a bit bleeding edge and I didn’t want to mess with the black screen bugs it has been known to cause.

So, I went on and decided just to go with the drivers straight from NVIDIA. Granted, they aren’t as community tested as the ones from Ubuntu, but they’d do the trick. So, I downloaded the newest stable .run file from NVIDIA for my GPU (you can access it here, if you need to – I believe this is the page with the newest drivers.)

Once the driver installer had downloaded I tried to run it from a terminal (Ctrl+Alt+T), but got this:

Screenshot from 2014-12-21 13:36:18

Obviously, I had to run the command when an X server wasn’t running. Pretty simple stuff – just pull up a TTY, kill lightdm, and you’re golden! Right? Wrong.

For whatever reason, there was/is a bug with the Nouveau drivers I had that meant I couldn’t access a TTY (nothing displayed), unless I booted with the GRUB flag nomodeset. Again, big deal. Just add the flag and reboot. Well, it’s not that simple. Turns out that when I added nomodeset I did get the TTYs…but my GUI was all messed up. So, I removed the GRUB flag nomodeset and rebooted. No TTYs but a working GUI. I guess it was choose your own poison day at Canonical.

This is where the awesome guys on Ask Ubuntu come in. I popped on over there and we started working together to figure it out.

The first solution that was suggested was running the command sudo init 1 command, which was supposed to take me into single user mode with just a command line – nothing else. However, for reasons unbeknownst to me and the other users trying to help me, I was simply being shown the Ubuntu boot splash and nothing else. Yet another issue.

So, that theory went out the window.

Now, you’re probably wondering – why didn’t you just boot with the nomodeset GRUB flag, install the drivers, and the remove the nomodeset flag? Honestly, I don’t know why I didn’t do that. After trying a few other things with init I booted with that flag, killed lightdm via sudo killall lightdm, and ran the installer. There was actually a warning that came up saying that a script had failed – but I ignored that (one of the other users said they’d had the same thing & just ignored it – no problems).

I removed the nomodeset flag, rebooted, and had a working desktop with decent FPS. Actually, quite awesome FPS – especially compared to my old laptop. Just to give you an idea of the performance increase it gave me – remember that I had said I wasn’t getting more than 20 FPS in Minecraft? Well, a picture is worth a thousand words:

fps

That’s with the render distance set to 14 and the graphics cranked all the way up. I had just barely loaded up the world and so was having lots of chunk updates. Once the world had fully loaded I could get well over 150 FPS stable on render distance 25 & everything fancy.

Now, I know that Minecraft isn’t exactly the crown gem of gaming prowess – far from it actually – but it’s what I had. I don’t game much, so my library is very limited and I don’t have any intensive games.

But yeah, that’s my experience/process with/that I took installing NVIDIA graphic drivers on Ubuntu 14.04.1. Not sure if it’ll help anyone much, but it’s what I had to do and I figured I’d blog about it!

Now, this didn’t actually fix the bug with the Additional Drivers not showing up correctly – I actually had another issue occur later on with Unity not loading correctly (I think I must have rebooted at an…inopportune time) and the solution for that (which I’m also going to be writing about) actually fixed it.

Make sure to comment below with any experiences you’ve had with graphic drivers and tell me what you thought about the post!

Tagged , , , , , ,