Wow, it’s been a while since I posted on here. I’ve been really busy working on programming projects with some of my friends and just haven’t had anything super interesting to blog about.
Enough with that though, let’s get on to what this is actually about! I recently saw a video done by the Youtuber Novaspirit Tech where he takes a Raspberry Pi 2 and implements the Amazon Alexa system!
I’ve had a Pi Model B since a few months after they initially launched and more recently received a Pi 2 from Element14 (you can watch my video reviews of them over on my, admittedly also recently neglected, Youtube channel AEVES Tech) and have been looking for interesting projects to do with them.
This hit the spot perfectly, and so I started out setting up my Pi Model B! Now, most of the tutorials use the Pi 2 as the base device, but my Pi 2 is currently serving as a code server for me, and I didn’t really want to go through the trouble of transferring everything over. Plus, I figured it might make the process a bit more interesting, in case I had to tweak some values.
Setting up the Pi
Obviously, the first thing needed here is to get the Raspberry Pi up and running.
The process of installing Raspbian differs a bit between whatever OS you’re using (Linux, Mac OS X, Windows) so I’m just going to give you a link to the official Raspberry Pi foundation’s page on how to do it.
Once you’ve got the SD card flashed, go ahead and stick it in the Pi. The next part depends on whether or not you want to have the Pi connected over WiFi or not. If you’re planning to just connect over Ethernet then you can skip over this section and move on.
I’ve always used the Edimax EW-7811UN and never had any problems with it on Raspbian, so if you need to buy an WiFi dongle I can definitely recommend this one.
I set up WiFi via the Terminal over SSH, which can be a little bit complicated, so I’m going to go over that here. If you’ve got your Pi connected up to screen and are using the GUI it’s easier.
Once you have terminal access (via SSH over Ethernet or via a Serial to USB cable) you’re going to need to find the SSID for your network. To do this, go ahead and run sudo iwlist wlan0 scan.
This is going to spit out a whole bunch of information, most of which we’re not going to need. Look out for these two lines:
-
ESSID:"networkNameHere"
This is the network name that you want to connect to. Make sure it’s your network, we’re going to use this value later on.
-
IE: IEEE 802.11i/WPA2 Version 1
This is the security type. Most modern routers are set up to use WPA2 Personal, and this tutorial will work with both that and WPA, but it may have issues with WPA2 Enterprise or WEP. If your network is set up with WEP, then you’ll have to adjust the setup a bit later on, and you really should think about changing to WPA2.
Now that we have that information, go ahead and run sudo nano /etc/wpa_supplicant/wpa_supplicant.conf and enter the following text:
network={
    ssid="networkNameFromEarlier"
    psk="yourWiFiNetworkPassword"
}
If you’ve got a WEP network, then you’ll need to change out the psk line for wepkey0=your104BitWEPkey. Make sure you don’t put quotes around that key.
To save the file, press Ctrl-X then Y and then Enter. This will save the file. Go ahead and reboot the Pi via sudo reboot.
Once you’ve rebooted, you can check if you’re connected or not via running ifconfig wlan0 and seeing if there is an IP address next to the inet addr field:
$ ifconfig wlan0
    wlan0 Link encap:Ethernet HWaddr 80:1f:02:bf:04:ec
     inet addr:192.168.0.12 <-- there is a number here Bcast:192.168.0.255 Mask:255.255.255.0
     inet6 addr: fe80::8ec:9767:b412:4a91/64 Scope:Link
     UP BROADCAST RUNNING MULTICAST MTU:1500 Metric:1
     RX packets:20891 errors:0 dropped:209 overruns:0 frame:0
     TX packets:7167 errors:0 dropped:4 overruns:0 carrier:0
     collisions:0 txqueuelen:1000
     RX bytes:22347220 (21.3 MiB) TX bytes:996632 (973.2 KiB)
If you have an IP address, then we can move on. Otherwise, make sure you typed the network password correctly in that file and try again.
Setting up Alexa
Hooray! You got the Pi set up, now we get to get started on the fun part, setting up Alexa!
You’re going to need to sign up for an Amazon Developer account, which you can do here. You’ll need to sign in to your Amazon account, and then go to this address: developer.amazon.com/edw/home.html. Once you’re there, click on the Get Started> button for Alexa Voice Service:

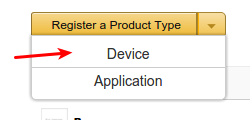
From there, you’re going to click on Register a Product and in the drop-down, select Device:

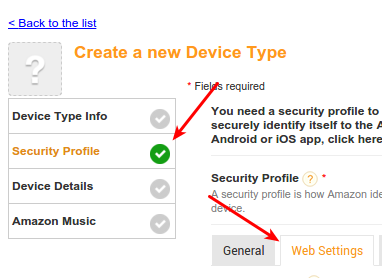
Now, you’re going to proceed through the four parts of the setup process. They’re personal choice for the most part, and the site does a good job of guiding you through, so there’s nothing I really need to explain other than the Web settings part.
This is important because of how you get permission to use Alexa (via OAuth), you have to set up origins and return URLs, otherwise you won’t be allowed to connect to the Alexa voice service. So, you’re going to need your local IP address for the Pi. This is pretty simple to get, just run ifconfig wlan0 | grep "inet addr" (swap wlan0 for eth0 if you’re connecting over Ethernet.). You’re going to want to take the value right after the red text:
![]()
In my case, it’s 192.168.0.106.
Take that value and under the Web Settings tab on the Security Profile page:

put that value in like this:

swapping out 192.168.0.106 for whatever IP address you got. Finish up the rest of the setup, and you’re ready to get on to the rest of the setup. Make sure to write down the Device Type ID, Security Profile Description, Security Profile ID, Client ID, and Client Secret – you’ll need them for the setup script later.
I’m using the code from sammachin’s AlexaPi repository, but it’s going to require a few tweaks to actually work. For now, just run git clone https://github.com/sammachin/AlexaPi and it should get the code right off Github!
If you get an error about git not being installed, just run
sudo apt-get update && sudo apt-get install git
and then try again.
Once you get the code, go ahead and type cd AlexaPi and then sudo ./setup.sh. This is going to install a few different required libraries and set up the Python code. You’re going to need the credentials you got from Amazon earlier, so put those in as requested.
Now, the setup script doesn’t work correctly, it doesn’t actually create the required creds.py file, so we’re going to have to manually do that ourselves.
Run mv example_creds.py creds.py and then nano creds.py. You’ll get a file that looks something like this:
# RENAME THIS FILE TO creds.py before use!
import os

#Alexa Settings
ProductID = ""
Security_Profile_Description =""
Security_Profile_ID  = ""
Client_ID = ""
Client_Secret = ""

# Alexa Refresh Token
refresh_token = ''
and put in the information from Amazon where it belongs in the file. Don’t worry about refresh_token still being blank, that gets taken care of in a bit.
If you are logged into your Pi as root, then you’re ready to go, go ahead and skip down to the hardware setup section. If not, read on.
The original code was written to be run as root, but this isn’t exactly good practice, so we’re going to have make a few changes to make it run correctly.
First you’re going to need to edit the startup script in /etc/init.d/alexa, run sudo nano /etc/init.d/alexa and look for the line
python /root/AlexaPi/main.py &
and change out /root for /home/pi. Once you do that, save and exit via Ctrl-X, Y, Enter.
Setting up the hardware
Since the Pi doesn’t have a built-in Microphone port, you’re going to have to use a USB device. It can be a USB microphone or a USB soundcard that has a microphone port. Plug that in, as well as connecting a speaker, either via the Pi’s 3.5mm jack, or via USB.
I’m using my CAD U1 USB microphone, and connecting a speaker up via the 3.5mm jack and it works just fine.
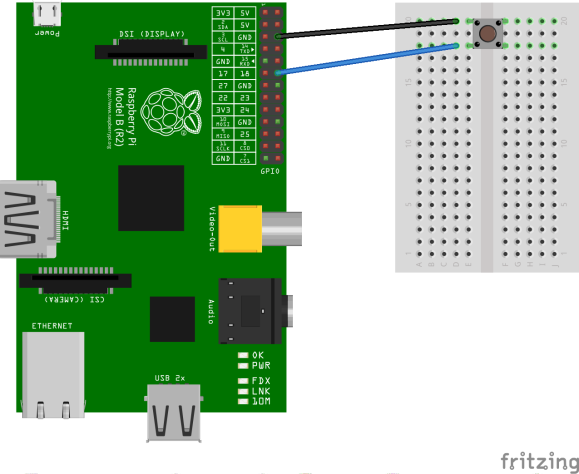
You’re also going to need to hook up a push-button connected to GPIO pin 18 and GND. Part of the terms & conditions of using the Alexa voice service is you can’t have it be voice activated, so we have to manually activate the listening via pressing a button.
Here’s a diagram to show you how to connect it up, if you don’t already know:

Final Setup
Now that we have the microphone, speaker, and button connected, we can go ahead and finish everything up!
You’re going to need to run sudo python auth_web.py and then go in a webbrowser to yourPisLocalIPAddress:5000. This will redirect you to an Amazon page asking you to log in and then confirm that you want this device to have access to parts of your account. Go ahead and continue through the login process.
After you log in, it should show a page letting you know that it succeeded and you can now reboot your Pi. Go ahead and do that via sudo reboot and wait for it to reboot.
You should now be able to boot your Pi and hear a female voice say “Hello”. Once you hear this, you can press and hold the button and ask Alexa a question!
If you don’t hear this after a while, you may have to SSH in and manually run the script. Just ssh in to the Pi and run
cd AlexaPi && sudo python main.py &
You should hear the “Hello” voice in a bit, and you can go ahead and ask away.
Congratulations, you’ve just created your own Raspberry Pi-based Alexa device!
Conclusion
Is this really useful? I suppose it depends on how you define that.
It’s a bit cheaper to build this than buy the $129 Amazon Tap, especially if you already have all the parts on hand. However, it looks far less pretty and isn’t officially supported by Amazon, so they could decide to end the AVS (Alexa Voice Service) at any time, leaving you with a Raspberry Pi connected to a speaker and microphone.
For the time being, it’s a fun little way to put your Raspberry Pi to use, and, if you really wanted an Amazon Echo and don’t mind a little bit of open circuitry, it’s saves you a little bit of money.